


Basics of Plug Propagation Webinar Summary – August 8, 2013
go.ncsu.edu/readext?235961
en Español / em Português
El inglés es el idioma de control de esta página. En la medida en que haya algún conflicto entre la traducción al inglés y la traducción, el inglés prevalece.
Al hacer clic en el enlace de traducción se activa un servicio de traducción gratuito para convertir la página al español. Al igual que con cualquier traducción por Internet, la conversión no es sensible al contexto y puede que no traduzca el texto en su significado original. NC State Extension no garantiza la exactitud del texto traducido. Por favor, tenga en cuenta que algunas aplicaciones y/o servicios pueden no funcionar como se espera cuando se traducen.
Português
Inglês é o idioma de controle desta página. Na medida que haja algum conflito entre o texto original em Inglês e a tradução, o Inglês prevalece.
Ao clicar no link de tradução, um serviço gratuito de tradução será ativado para converter a página para o Português. Como em qualquer tradução pela internet, a conversão não é sensivel ao contexto e pode não ocorrer a tradução para o significado orginal. O serviço de Extensão da Carolina do Norte (NC State Extension) não garante a exatidão do texto traduzido. Por favor, observe que algumas funções ou serviços podem não funcionar como esperado após a tradução.
English
English is the controlling language of this page. To the extent there is any conflict between the English text and the translation, English controls.
Clicking on the translation link activates a free translation service to convert the page to Spanish. As with any Internet translation, the conversion is not context-sensitive and may not translate the text to its original meaning. NC State Extension does not guarantee the accuracy of the translated text. Please note that some applications and/or services may not function as expected when translated.
Collapse ▲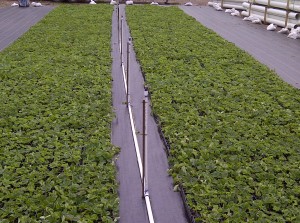 This first in a series of webinars was held on August 8, 2013 for North Carolina strawberry growers who are planning to propagate their own plugs and possibily save some money. Highlights of this webinar are included below.
Disease Management of Plugs
Dr Frank Louws, plant pathologist, contributed a disease management leaflet to the program. This leaflet was discussed and mention was made of how Dr. Louws prefers the outdoor production environment for plugging.
Disease Management Considerations for Producing Strawberry Plug Plants
Fertility Management of Plugs
What about fertility of plugs?
Answer. There is not very extensive literature on the subject of strawberry plug propagation, and there is definitely very little information on plug fertility (while in plug tray). Though it would be nice to have more “research-based” guidelines on fertility strategies for strawberry plug plants, the fact remains that a great deal more research is needed! In reference to the fertility information below, I am very indebted to David Dycus, NCDA Regional Agronomist, for the work he has done to gather information on the different approaches that growers are taking to plug fertility. David surveyed several farmers on their plug fertility practices and here is what he learned about one farmer who was spraying his plugs with an 18-18-18 fertilizer:
The grower mixes 4 lbs of 18-18-18 and 3 lbs. of Epsom salts in 100 gallons of water and sprays on the plants directly. These 100 gallons covers about 4/10th of an acre. Thus, on an acre basis, the farmer is applying 250 gallons of water. If you use the standard formula for calculating ppm (below), it is apparent that this grower is using about 345 ppm. If the farmer would drop back to 2.25 lbs. this would be around 200 ppm – that is all that is needed for good plant growth
If you are dissolving fertilizer in a bulk tank or sprayer and then applying directly from that tank the formula you would use is: ppm = % fertilizer x lbs. added to tank x 16 x .75 x 100/gallons of tank or sprayer (for spraying one acre)
Thus, 18 (%) x 3 (lbs) x 16 x .75 x 100/250 = 345 ppm
Recommendation: drop down to 2.25 lbs to reduce this rate to 200 ppm (1.125 lbs = 100 ppm)
Why might it be important for this grower to do is to reduce his fertility down to 200 ppm, or perhaps even lower? Dr. Louws gives us the main clue in his article (that appears in this newsletter): “Avoid excess fertility and misting. Excess moisture and fertility favor disease.” In another article that recently appeared on plug recommendations, pointed out that:
“Do not fertilize just planted tips. The fertilizer charge in most potting media will be sufficient until the plants are well-rooted. Fertilize for the first time at two weeks after planting using 100 ppm of nitrogen with calcium nitrate as the source, and repeat at weekly intervals. If you are holding the plants for longer than 4-5 weeks (thus creating super plants), switch to 20-20-20 at 100 ppm of nitrogen for later applications.”
Thus, an argument is being made here to go with only 1.125 lb of the 18-18-18 fertilizer, or about 100 ppm. We do not have any guidelines to provide on fertilizer source at this time, and for many years I have been saying that a greenhouse grade 20-20-20 would be ok to use, but this article from PA is saying that calcium nitrate is a better source in the 3rd and 4th week. I have taken the view that it may be better to apply the fertilizer in the morning, than the evening, so that the plugs are not too wet going into the night.
Webinar Related Files
Webinar Presentation (PDF)
I am in Eastern NC and I just received my tips today (9/11), and I was wondering how long can I hold the tips? I won’t have any labor to stick tips until this Saturday (9/15).
Answer: My experience with tips that are coming down from PEI or Nova Scotia is that they have a very good shelf life. If you are able to hold them in a cooler at say 35 F, then you should have no problem with holding these tips until this weekend. You can pretty much count on having a good week of excellent shelf-life if the tips are kept cooled and are in plastic liner. Another pointer is to get you labor there early in the morning! Try not to stick tips in the warm part of the day.
What is a good misting schedule?
Answer: One large propagator I know simply runs the mist every 3 minutes for 30 seconds for the first 3 days. I know of another propagator who insists on running the mist constantly the first day if it is hot. Below you will find a “recipe” that I have been following for plug misting under NC conditions in late summer for a number of years. I would like to say that if it is quite hot on the first day of rooting (Day 1), I am willing to go with running 20 seconds of mist every 1 1/2 minutes. You have to use your judgment! Your goal is to keep the leaves moist until the tips start to create their own roots. Hot, sunny days will require extra mist, while cooler, cloudy days less mist.
Day 1
20 seconds every 2 ½ min. from as soon as you start rooting in the early morning, and then keep running the mist until about 6:00 to 6:30 p.m. If temperatures are mild you may find that a 3 minute cycle with 10-15 seconds is adequate the first day
Day 2
Plugs should be standing up and turgid in the morning (not flopped over), and if the day is warm, I would continue with the more intensive misting cycle (20 seconds every 2 ½ min) for the 2nd day, from around 8 a.m. until about 6:00 to 6:30 p.m. (DAY 2 and 3 are ultra critical, and you must have someone be responsible for monitoring the system very closey).
Day 3
If warm/hot, stay with 20 seconds every 2 ½ min from 8 a.m. until 6:00 to 6:30 p.m.
Days 4-5
I tend to be more conservative than some “pluggers” and I am inclined to go with 10-15 seconds every 5 minutes. This may result in too much misting? You do not want to saturate the soil media with water (you will know this if the trays are “heavy” to lift up). The idea is to make sure the leaves always have some droplets of water. Some propagators will go to a 10 seconds every 10 minutes for days 4-5.
Day 6-7
By the the 6th day you should be seeing some new rooting in the plug cell. At this stage you may be able to go with misting from 9 a.m. to 6 p.m. for 10 seconds every 15 minutes. On day 6 the first watering of the day should be long enough to completely wet the soil.
The misting schedule after the first week must really be determined on the basis of well the plugs are rooting up until this point and weather conditions. In other words, the right misting schedule will vary depending on conditions. Some propagators have found success on days 8-10 by misting from 9 a.m. to around 6 p.m. for 15 seconds every 30 minutes, and then they lengthen the interval each day. The actual misting period may stay at 15 seconds, but on days 11-13, you can consider misting from 10 a.m. to 3 p.m. each hour. By day 14 the plugs should have an excellent root system, and from this point on, the practice is to sprinkle for 5 minutes at 1 p.m., and then again in the late afternoon if temperatures are high.
This webinar was sponsored in part by NC Strawberry Association, Southern Region Small Fruit Consortium, and N.C. Cooperative Extension.